Monitor Windows Machines with NRPE
Note
NRPE is deprecated. This is not the recommended way to monitor Windows hosts. Please opt for WMI instead. NRPE documentation is here for legacy versions of NEMS Linux (ie., 1.0-1.3.x).
The Nagios Remote Plugin Executor (NRPE) allows your Nagios Enterprise Monitoring Server to communicate with the Linux machines on your server to determine things like free disk space, CPU load, and detect possible issues that a simple ping can’t determine.
As of NEMS 1.2 NSClient++ is optional for monitoring of Windows computers (thanks to the addition of WMIC). If you’d like to use it, please follow the directions below, otherwise use the provided WMIC-based check commands.
This is not supported on modern NEMS Linux.
Grab the latest Windows client at https://www.nsclient.org/download/
Install the client with the following settings:
Select to install the “Generic mode” NSClient++.
Choose “Complete installation” and if asked, choose to save config to ini file.
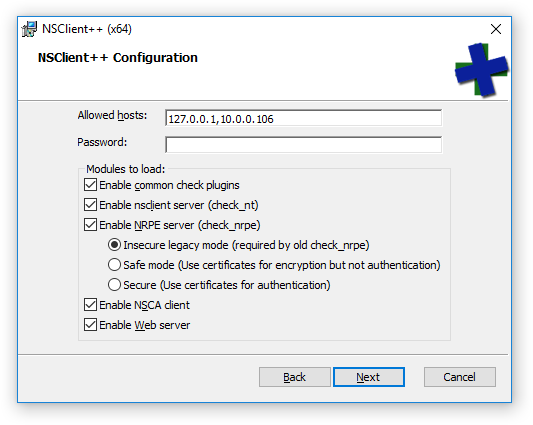
Under “Allowed Hosts” it should read 127.0.0.1,NEMSIP (where NEMSIP is the IP address of your NEMS server)
Clear the Password field for ease of deployment. NEMS sample scripts are setup to use NRPE without a password because I’m making the assumption that this is being deployed in a trusted LAN. If you do not blank the password here, you will have to edit all the scripts before NEMS will be able to communicate with this computer.
Enable all modules and change the NRPE mode to Legacy.
Screen should look a little something like this:
Add your Windows host to NEMS.
Tip
Important Firewall Note If you have a software firewall running on your Windows machine, setup an exception for your NEMS server IP to gain access through ports 5666 and 12489.
And there we have it! Your NEMS Server can now check your Windows machine at a deeper level using check_nrpe.